
For Admin users only
Please note that only users with Admin access can change Data Masking settings.
Introduction
Sense Masking helps you scan your website for personal data and get masking rule suggestions.
As you browse your website, Sense identifies pages and elements that may contain personal data. You can review each suggestion before accepting or rejecting it.
Sense is optional:you can use it to help configure your masking rules, or continue managing them manually in the Data masking settings.
See how to set up and manage Data masking
⚠ Important
This feature uses AI to generate masking suggestions. AI can make mistakes, so review each suggestion carefully before accepting and saving your changes.
Before you begin
Before scanning your website:
- Use a test account and test payment details.
- Never enter real personal data.
- Identify the key pages you want to scan, such as profile settings, payment flows, or billing pages.
- Make sure your account has accepted the Contentsquare AI Terms. Accepting these terms is required to access Sense and Sense Masking.
Scan your website
Open your project in Contentsquare.
- Go to Account > Project and users.
- Select the Data masking tab.
- In the Sense banner, select Get started.
- Select the website domain you want to scan.
- Select Scan website.
- Browse the key pages of your website, including pages that may contain personal data.
Sense scans the pages you visit and suggests masking rules.
Tip: Interact with important content, such as forms, pop-ups, and modals, so Sense can scan it.
Review masking rule suggestions
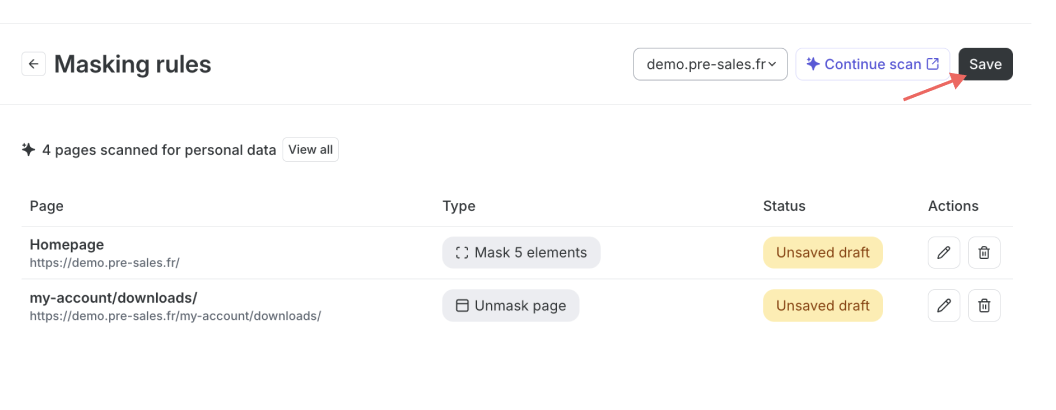
When you finish scanning, the Masking rules page shows the pages that Sense scanned.
For each page, you can see:
- The page name and URL
- The type of suggestion, such as Mask elements or Unmask page
- The suggestion status
- The Review action
- Find the page you want to review.
- Select Review.
- Review the detected personal data and page preview to make sure the suggestion is right for your site.
- Check the suggested action.
- Select Accept if the suggestion is correct.
- Select Reject if the suggestion is incorrect or should not be applied
- You must accept or reject every suggestion before saving your changes.
Scan more pages
To scan more pages:
- On the Masking rules page, select Continue scan.
- Browse the additional pages you want to scan.
- Return to the Masking rules page to review the new suggestions.
Save your changes
After reviewing the suggestions:
- Accept or reject each suggestion.
- Select Save.
- Confirm your changes.
Your saved rules appear in the Element rules section of the Data masking tab. See below for more information.
Modify or add masking rules manually
Sense is an optional starting point for your masking configuration. It does not replace your existing Data masking settings.
After saving your suggestions, the rules appear in the Element rules section of the Data masking tab.
To review your rules:
- Go to Account > Project and users.
- Select the Data masking tab.
- In the Element rules section, select View.
4. Review the rule name, pages, type, last edited date, and status.
5. To modify a rule, select the Edit icon. To remove a rule, select the Delete icon. To create a rule manually, select Create rule.
For more information, see How to set up element masking rules.
6. Select Save to confirm your changes.
For more information about the default masking approach, page rules, and manual masking configuration, see How to set up and manage Data masking.
Important notes and limitations
Sense Masking may not detect all personal data. It only scans the pages you visit.
Detection may be limited for:
- Content that was not loaded or viewed during the scan
- Dynamic content, pop-ups, modals, hover states, and infinite-scroll content
- Authenticated pages that you did not access
- Content contained in images, video, canvas, or third-party elements
- Elements that Sense cannot display in the page preview
Sense Masking is an assistive tool and does not replace your existing privacy and masking processes.
Make sure that:
- All relevant personal data is masked.
- The suggested selector targets the correct element.
- The rule does not hide more content than intended.
- Any content being unmasked does not contain personal data.
Review your masking rules after significant website changes, such as:
- A redesign
- A replatforming project
- New page templates
- New forms or checkout flows
- New personal data fields
- Changes to your website structure
- Changes to your Contentsquare implementation
Sense Masking does not guarantee complete personal data detection.
FAQs
Does Sense apply masking rules automatically?
No. Sense provides suggestions for your review. You must accept or reject every suggestion before saving your changes.
Does Sense scan my entire website?
No. Sense scans the pages you visit during the scan.
Does Sense detect all personal data?
No. Sense may not detect every instance of personal data. Review every suggestion carefully and use the manual Data masking settings if needed.
Can I modify masking rules manually?
Yes. After saving your suggestions, you can modify existing rules or add new rules from the Data masking tab.
For more information, see How to set up and manage Data masking.
What should I do if an element can’t be previewed?
Some elements may appear inside a modal, panel, or another interface that Sense couldn’t capture visually. You can still check the personal data identified by Sense and confirm that it is being masked.
What should I do if Sense misses personal data?
Review the page again and use the manual Data masking settings to add or modify the relevant masking rule.
Does Sense affect Session Replay?
Yes. Masking and unmasking rules apply to Session Replay, Zoning and Heatmaps.
What should I do if I’m not sure about a suggestion?
Reject the suggestion and review the page using the manual Data masking settings.